Showing posts with label craft. Show all posts

Friday, March 11, 2016

Easter decoration ideas

Easter is coming and if you are someone who enjoys making your own Easter decor, I have a great collection of ideas for you. Each of these ideas feature bright colors, pretty flowers, or other spring embellishments, making them the perfect choice for your Easter decorating.
Grab your creativity and find the project that best suits your decoration needs.
If you’re looking for a fun activity, try a few of these creative ideas for decorating Easter eggs! 
These sprinkle Easter eggs are quite delicate but so pretty! Source

Glitter Easter eggs - They’re beautiful, aren’t they? Source

Other amazing  and easy to make ideas
All you need for this monochromatic look is a fine-tipped black permanent marker, overall effect is clean and modern. Source
I think I will try it this year but with colorful marker


Use string or baker’s twine to secure flowers and herbs to eggs

Break out some acrylic paint to try this egg-decorating trend . Source

Easter table decorations and centerpieces are the perfect way to prepare for any spring dinner with friends or parents. 
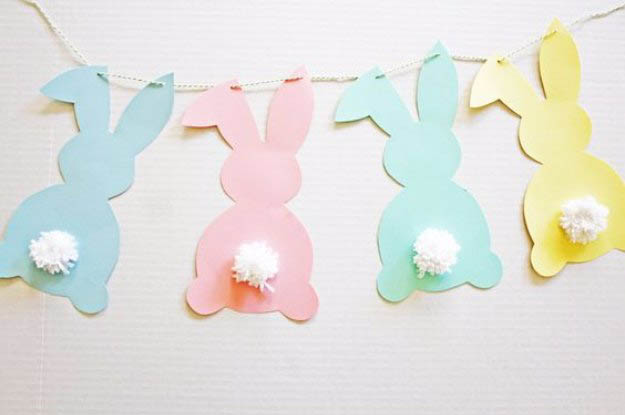
Cotton Tail Bunny Garland is a great project to make with your kids. Source

Unique napkin folds can make a table setting extra entertaining.  Bunnies we made last year and this year I found this wonderful idea – you can fill the pouch with flowers or chocolate eggs. Source

With origami bunnies you can make a garland or simply put on the plate. Source

A well decorated table is what turns an ordinary meal into a holiday. Get your table into the holiday spirit with some creative and very cute Easter table decorating ideas.


Follow my blog with Bloglovin

Saturday, September 14, 2013

Seashell earrings DIY. Yes, other one!

Other one DIY after summer - other pair of seashell earrings. This is one of the simplest projects I’ve ever posted. 

You will need:
  • shells 
  • flat nose pliers
  • two pieces of thin chain of about 8 cm/2" length
  • earrings hooks
  • 2 jump rings about 5-6 mm/ 0.02" 

Seashells I picked up were already with holes (well, I was lucky). You can drill holes in them. How to do it? - Refer to the husband / friend / brother, they come up with, I'm not to know the first thing about this.
My box of shells probably has enough for many pairs of earrings. Sort through yours until you find pairs you like.

Open one jump ring, and thread it into the hole in the shell and lock.

Then open the earrings hook, turn the loop and insert into the middle of the chain.

Put the ring with shell and close earring hook.

Repeat operations for the second earring and voila - your earrings are ready! 
Wear them and be like a mermaid!

Wednesday, September 11, 2013

Seashell dangle earrings DIY

Many of us after the summer vacance bring at home a lot of sea shells, because they are so beautiful, so cute! IT's impossible to refrain yourself and don't pick them up. But on return at home, the question arises - what to do with them? I present to you one of the ways to use thes shells!
This DIY is simple and easy!

You will need:

  • shells (4, 6, 8 - how many you want)
  • flat nose pliers
  • two pieces of a chain of about 5 cm/2"
  • earrings hooks
  • jump rings about 5 mm/ 0.02" (quantity - number of shells)

Seashells I picked up were already with holes (well, I was lucky). You can drill holes in them. How to do it? - Refer to the husband / friend / brother, they come up with, I'm not to know the first thing about this.

Open one jump ring, and thread it into the hole in the shell.

Then pass it through the last link of the chain and lock.


Repeat with remaining shells, distribute them evenly over the length of the chain. The last shell attach to the second end of the chain.
Then, attach the chain to the earring hook. The first earring is ready!

Repeat operations for the second earring and voila - your earrings are ready! 
How wonderful they will set off your taned skin!

Tuesday, February 12, 2013

Valentine's day handmade card with seed beads


Valentine's Day is just around the corner!!!  Why waste a lot of money buying a card, when you can make your own personalized card!
This is the way to give something special and also inexpensive to replace those mass-produced cards and bring a bigger smile to your loved ones’ faces.
This project is takes a few minutes and also customizable. It’s easy and adds a very glamorous touch to your love notes.

Matherials:
Blank Card
seed beads (use the color you prefer, I used mixed seed beads in blue)
Glue
Pencil

Use a pencil to hand write your personal message

 Trace over your letters with glue


Add seed beads over all card (better if you make it over a big plate)

Bend the card allowing excessive seed beads to drop in the plate.  Add some bead manually if not all glue is covered. Allow time to dry.
Add a personal message to the inside of your card.

Tuesday, September 4, 2012

I'm a featured artist

I'm so excited to write that I was featured on the one wonderful site : http://cottonridgellc.com. I't so nice site and has articles about many interesting artists, some of which are my friends )

This is article about Yelena Turetsky Merener - she make wonderful jewelry.
And this is article about Irina & Eugenie Muminova of Mulberry Whisper. They are living in Uzbekistan, country which I always dream to visit! They create amazing handmade clothing, pillow covers and accessories made of natural silk and cotton fabrics with ikat pattern.

Thursday, February 2, 2012

How I organized my earrings

As many of us I have many earrings and it's growing every day) You are also spending way too much time trying to find a matching pair of earrings: they are mixed up, catch each other...
Some times ago I saw one great and simple idea in Internet how to organize earrings, but I did not have a time to realize it. So now I don't work more (yes, I forfot to write about it) and I have many tome to crafting. This idea is to take a simple grater and color it, then you can hung you earrings)
Last week I gone on the marker and bought a grater - 3 euro.
Then I visited a hardware store and bought a little bottle of color for metal - 3.6 euro. It's perfect also paint spray. I colored grater at home (first one side, then other, otherwise you smudge) and decorate it's top with piece of vintage lace.
Here is it:


Now remained only find a way to organize necklaces and studs)

Tuesday, July 12, 2011

Desert Rose

Now arrived the most hot time in south Italy.  Temperature varies from 33°С to 38°С (91,4F to 100,4 F). Last year on my birthday July 13 was 42°С heat (107,6 F). All the grass has dried, there are no flowers in the fields. And the only oleanders bloom with their strange beauty along the roads. 


All around me have beige color  - It's color of dried grass, golden-beige color of the sand on the beaches... Also town is beige because all the houses here are made from beige stone from Lecce.  All this golden and beige dilute splendor has inspired me to create this ring. I called it  "Desert Rose". It remember me about the sand, the desert and dry wind. 
I made crochet flower from sand colored cotton thread and decorated the center with vintage glass bead. Then I connected it to beige leather flower. Together these two different textures make this ring similar to dunes of Sahara with their dark and light splashes.


©2009 Katrinshine | by TNB