Showing posts with label diy. Show all posts

Friday, March 11, 2016

Easter decoration ideas

Easter is coming and if you are someone who enjoys making your own Easter decor, I have a great collection of ideas for you. Each of these ideas feature bright colors, pretty flowers, or other spring embellishments, making them the perfect choice for your Easter decorating.
Grab your creativity and find the project that best suits your decoration needs.
If you’re looking for a fun activity, try a few of these creative ideas for decorating Easter eggs! 
These sprinkle Easter eggs are quite delicate but so pretty! Source

Glitter Easter eggs - They’re beautiful, aren’t they? Source

Other amazing  and easy to make ideas
All you need for this monochromatic look is a fine-tipped black permanent marker, overall effect is clean and modern. Source
I think I will try it this year but with colorful marker


Use string or baker’s twine to secure flowers and herbs to eggs

Break out some acrylic paint to try this egg-decorating trend . Source

Easter table decorations and centerpieces are the perfect way to prepare for any spring dinner with friends or parents. 
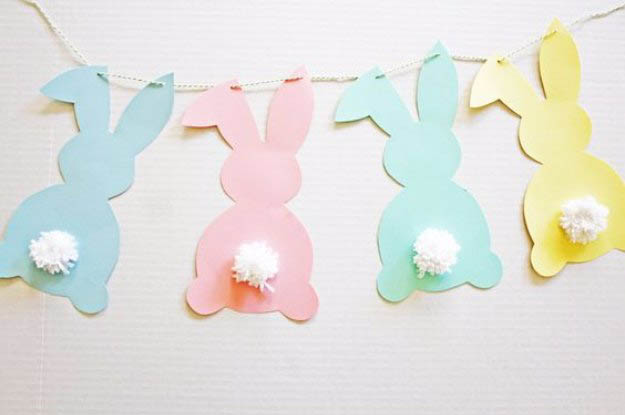
Cotton Tail Bunny Garland is a great project to make with your kids. Source

Unique napkin folds can make a table setting extra entertaining.  Bunnies we made last year and this year I found this wonderful idea – you can fill the pouch with flowers or chocolate eggs. Source

With origami bunnies you can make a garland or simply put on the plate. Source

A well decorated table is what turns an ordinary meal into a holiday. Get your table into the holiday spirit with some creative and very cute Easter table decorating ideas.


Follow my blog with Bloglovin

Thursday, September 25, 2014

New pattern for colorful beach crochet skirt

As I wrote before I forgot to write about my new crochet creations I made this spring! I already presented fringed skirt  So, today I show you the new one beach skirt in nive fall colors This is amazing beach skirt easy to make and beautiful. As I'm a lover of bright colors and when I saw this multicolored yarn I was mazed!! I combined it with olive green, orange and pink yarn I already had so this is my new crochet skirt:


Thursday, September 18, 2014

New pattern for fringed boho beach crochet skirt

I can't understand how I can forgot to write about my new creations I made this spring - fringed crochet skirt! Maybe I was totally busy with making t-shirts. This is amazing boho beach skirt easy to make and beautiful. As I'm boho lover and I adore fringed clothing so the fringed skirt I had to have!!
I had a lot of compliments this summer wearing it) 
You can buy it here


Friday, June 20, 2014

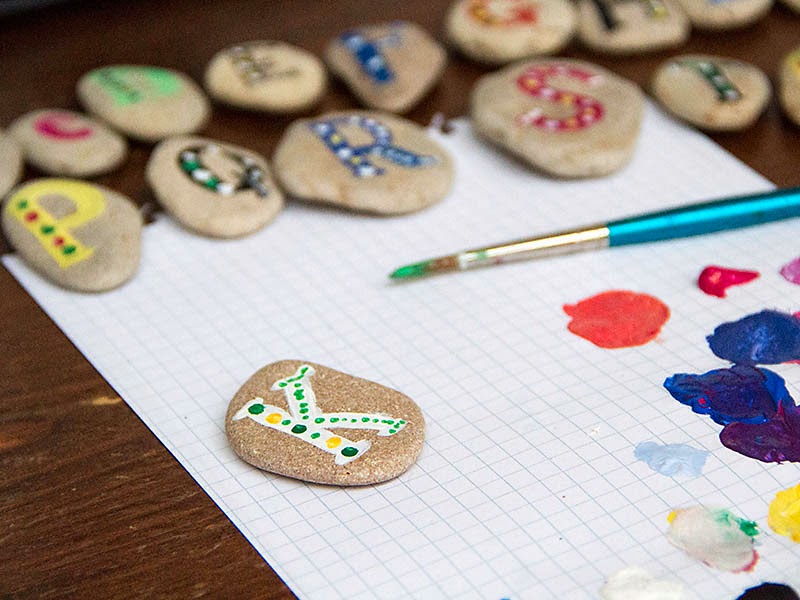
Colorful alphabet on pebbles DIY

My friend Nadya from HappyEmotions sell in her shop wonderful Alphabet Pebbles for Kids. I love them very much! It’s a fun way to teach a toddlers letters in a bright, whimsical way. 
On one of our tracking trip I found on the beach very similar stones (usually here there are only sand and seashells) . So I decided to make this alphabet to niece of my husband.

You will need

26 pebbles
Various acrylic paint colors
Paint brushes

Clear Satin Glaze

1. Wash pebbles to remove any dirt
2. Make pebbles in row to see which stone better for which letter


3. Using your paint color, paint the first letter.  Then with other colors paint all letters

4. Now we will decorate them - add polka dots onside each letter. You can outline white or yellow letter.

5. Add polka dots around each letter.
6. Spray with glaze.  Once dry, turn over and spray the back of the rock too
Your alphabet is ready)


Thursday, May 8, 2014

Crochet strawberry DIY

Last time I absolutely don't have a time ro write new posts so I ask my friends who want to write it for me)) So today I share with you this wonderful and simple DIY by MiracleFromThreads 


Crochet strawberries
In spring and summer we especially want bright colors and delicious berries. And if these colors are always bright, it is especially nice.
I want to tell you how to make delicious juicy bright strawberries for your home decor.
I can not tell how it explained in the books, I'm going to explain how I do it.
You will need a green, red and light yellow yarn, appropriate hook and wooden beads (resin ones are going well too).
How to make a crochet ball you can read also in other my post  so here I show only pictures. If you need explanations, go and read here.
Take red yarn and make a ball,  make the pointed end.

Then we crochet small leafs of the strawberry.
Begin from the other end of he ball where you don't have the pointed end. Introduce the hook, grab green thread and draw out making the loop. Make 4 chains. Attach with the crochet to the red berry, then make 2 half DC and 1 DC. Attach the leaf into the base of our berry. So, Your first leaf is ready. 

Make 5 leaves, you should have a circle of leaves. Make 3-4 crochet over the hole to cover it. Then make a 5 chains. Cut the thread and hold out it.


with the yellow thread embroidery corns over the red strawberry.

Remove all of the thread tails. 
Your strawberry is ready! 

Tuesday, February 18, 2014

Barefoot sandals by Lasunka for your happy summer

Today I present to my readers talented handmade artist Victoriya. She has a shop on Etsy called Lasunka.
She wrote me some words about her:
“My name is Victoriya. I was born in Russia and spent most of my life there but then I met my future husband who changed my life. We’ve got married, I’ve moved to Greece and now we have 5 children and we live on Paros Island here. I am paying a lot of attention to our family life but I love to create so I always fine a time for it. 

Creating something with your hands charge it with the atmosphere of creativity and love. This gives you the opportunity to stand out. Every creation is individual and made especially for you. I like to make my friends and family happy with handmade accessories. And I want that these beautiful accessories make you happy too, like other people who has had a chance to appreciate the beauty my barefoot sandals. "


Barefoot sandals and high socks, made by Lasunka are lacy and delicate creations for girls who easyly and light-hearted walking through life and enjoy every moment. 
These barefoot sandals can be worn for a walk along the beach, to a pool party, on the yoga or just at home. But the most special occasion is to wear them for a beach wedding ceremony, after all, you don’t need shoes on the beach? Then your bare feet will feel tenderness of warm sand and everyone will admire you.
wedding Barefoot sandals

Barefoot sandals look equally advantageous with naughty short skirt, shorts, breeches and even with jeans, as leg warmers with lacing. Oh, yes, these are my favorite! Of course you can’t wear them with jeans, but with a short skirt is’t just a win-win situation! All mens yes will be caught up by your legs, they will attract them like a magnet. Believe me - tested in practice!


I’m a happy owner of Victoriya’s barefoot sandals and they never leave my beach bag, because I do not know in advance when I’ll have the opportunity to wear them)

Victoriya gifted to my readers possibility to make their own barefoot sandals with this diagram:
It's easy to follow. Take thin cotton thread, better bright, make 5-6 ch in chircle. Then make 3 chains instead of first DC of every row. on the last row in angle instead make 15 chains instead of 5. When you finish, add two laces in remaining angles of triangle and your barefoot sandals are ready!


Thursday, December 19, 2013

Felt Christmas tree ornament DIY

Today I 'll show you how I decorated my Christmas tree this year. I'm tired of the traditional sphers etc, so I searched in Internet for interesting ideas and stopped on decorations made out of felt. You can make them in many variations: with embroidery or without it, with crochet snowflake... The last one I liked most, so I 'll tell you how to make it. 


You will need:

  • piece of felt (which is not easier, sold by the meter )
  • Crochet thread (I used white and azure , as I love the combination of red and azure )
  • needle
  • scissors
  • button of flat
  • optional filler cushions

Let's start with the making a small snowflake, like this one:


And then cut two circles a couple of cm larger then snowflakes.

Make these loose stitches. Place the snowflake on top and sew it as shown, using previously made stitches. 

Make a few decorative stitches between the rays of the snowflake and sew a button in the center of it, now you can connect two circles. You can use simply forward stitch, or as I did use back stitch. You can fill in with a little amount of filler.
At the end make a loop :


That's what we got:
With embroidery and filled inside:


and stars

I hope you like them as I like and you decide to decorate the Christmas tree with these ornaments)
 

©2009 Katrinshine | by TNB