Friday, August 30, 2013

Midi crochet dress

After beach dress i made before in spring, arrived a time to crochet a new dress for summer evenings. Dress to the knee I made in 2012, so I decided crochet a maxi dress.
Initially, I loved the dress from Anna Kosturova, I even started to crochet it. 

But the after made about 30 cm I realized that I do not like uniformity of the it, because all the dress from top to bottom has one pattern.
After that, I found an amazing dress " Enchanted " from Olia SexyCrochet. Here's a link to the site http://sexycrochet.com/ru/2013/03/28/

The original dress is made from a cotton/silk blend of light beige color. Last year I crocheted a beige dress, so this year I decided to make it a chocolate brown. I made the thread from two silk threads and one viscose. The result was a light, pleasant to touch and cool yarn.
In the process of crocheting the Free People dress with fringe from knee down to one's ankles caught my eye, and I decided to change the original idea of ​​maxi dress.

After finished the dress at the level of knee, I tied a few bundles of fringe. Evaluating the general view in the mirror, I realized that I like it is with th midi length) without fringe) especially because lately I love this length.
In general, it was the longest my project, because I started to the professional course and it was time-consuming. Then I crochet out the first dress, made ​​a mistake in the pattern, recrocheted the neck (as it was too high) - a lot of things ). In total, I was crocheting it about 3 months! But I think the result turned out very beautiful )


The scheme for the dress you find here
Circle motif:

 Half-circle motif between circles:

Main motif of the top:
Motif for the center of the top

Motif for the bottom


To make the bottom of the dress larger you should increase the hook, this pattern unfortunately can't be modified.

This dress is not for beginners, but for more experienced crocheters.

Wednesday, August 14, 2013

Candle holder from glass jar and doilies

Today I'll show you how to make a beautiful candle holder from glass jar and crochet doilies. It needs a minimum of time and materials as you can see. And this is another way to use crocheted doilies.

You will need:
- Glass Jar (I took one from yogurt)
- 2-3 small crochet doilies 
- Ribbon, cord - everything you prefer to decorate the jar's top
- Glue in spray (you can use also not in spray, but it's more convenient and easier to use)

So, let's begin.
Lay the paper on a work surface and place the doily, face down. Apply the glue uniformly on the doily.


Take doily with care and attach it to the jar, stretching to avoid folds and positioning pattern uniformly. I used two bigger doilies and two smaller cuted out from an old tablecloth.

You can attach doilies as you like - covering all jar, or just one part, or use a rectangular doily and glue it on the bottom of the jar.

Attached all doilies, we have to decorate the top of the jar. I used the organza ribbon, but you can decorate with any ribbon or cord so on.

Tie a bow, put a candle inside and enjoy a romantic evening!

Saturday, July 13, 2013

Tank with crochet or lace back

Today I'll show you how to make a tank with lace back. You can use store bought lace, buy a big crochet doily or centerpiece or crochet it yourself.


To start, you'll need a tank of your size. I chosen a fuchsia one, because I had a piece of old tablecloth, hand dyed in fuchsia.

Then you need the right color trim, 2.5-3 cm wide (you can use tighter if you are using lace insted of crochet piece) about 3-4 feet. I boughtcotton trim, but you can buy and satin one, if you prefer.

You will need - thread, scissors, pins, needle, an iron and a sewing machine. Well, a little skill to sew.

Lay the tank on a work surface and place the lace on the top.
Then cut the lace on form the tank.
Cut off the back of the tank, leaving space 2-3 cm/ 0.8-1.2" from the seams.

Fold the trim in half, iron it - so you can more easily handle the edge with it.

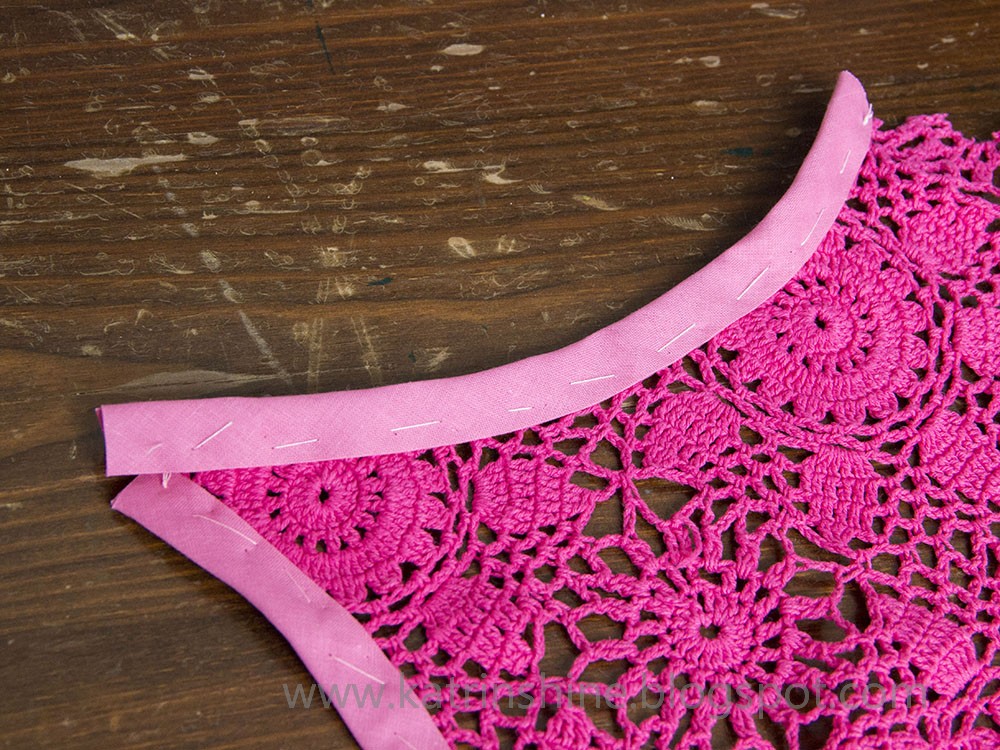
Pin the trim around on armholes and neck, gently stretching the trim.
Baste it.
Sew on a machine, retreating from the edge of 1-1.5 mm/0,04-0,06", stretching the trim.

Remove the basting and iron armholes and neck, giving them a slightly rounded shape.

If necessary, fold the bottom of the lace twice and sew on the machine. I used a piece of crocheted tablecloths, so I have the bottom edge of the tablecloth and I did not have to sew it.

Then put the front of the tank and the lacy back together with the face inside, and pin the side seams and shoulders. Baste them and sew on the machine.
- On the front side, bending the seam towards the back, sew a zig-zag stitch with a maximum margin and the length of about 2 mm/0.01". 
- or: handle the seam inside with zig-zag, then reverse the tank and on the front side, bending the seam towards the back, make a normal seam.
Check the inside and cut off the excess seam allowance, which is not hit by a zig-zag.
Iron the tank.
Your wonderful tank with crochet back is ready!!!


Tuesday, July 2, 2013

Denim shorts decorated with lace ribbon

I love the shorts, they are much more convenient for me than short skirts and look great. This year I bought a new pair of denim shorts, so I decided it was time to upgrade the old ones.

You will need:
- lace ribbon (best buy cotton one, not synthetic, since denim shorts are made from cotton...)
- denim shorts
- scissors
- sewing machine
- needle and thread
- pins

Measure the width of the pant leg and cut the lace ribbon little longer.
Lace ribbon that I liked, was wide, so I had to cut it into two parts. The second half of the ribbon I I’ll use to upgrade the jeans.

Ends of the lace will be between the legs so that it will not be seen. Pin the ribbon and then baste it. 

Given that I cut the ribbon along the length I sewed first the top of the ribbon with zig-zag seam to prevent unraveling, then with usual seam I sewed closer to the fringe.

Updated denim shorts with lace decor are ready! All I needed – are a few minutes, and brand new summer item already in my wardrobe!


Jeans are next)

Sunday, June 30, 2013

Tutorial - Tanks with upcycled vintage crochet doily back

As I wrote before here: Tanks with upcycled vintage crochet doily back I sewn a doily as appliqué on the back of the top. So today I show it step by step so you can make it at home and have a absolutely unique top. You can decorate also t-shirt.
The doily should be neither too small nor too big. Put it in the center of the back and draw  a circle with a chalk. Circle should be smaller than doily about 1 cm/0.4" from every edge, it's necessary for the seam allowance.

Cut out a circle from the back of the top.

Then cuff inside the edge by about 0.7-1 cm/0.3-0.4" and pin the napkin.

Baste it.

After that, sew from the back on the sewing machine with zig-zag stitch with the largest width of the stitch. Zig-zag finish the edge of the top and it is not unknit. Control the sew and cut out superfluous fabric.

Here's the result:


Saturday, June 22, 2013

Tanks with upcycled vintage crochet doily back

A month ago I've bought colorful doilies on local flea market. First I thinked to sell them as they are. But after that one idea crossed my mind: to buy colorful tanks and sew a doily as appliqué on the back. I visited a few teenagers brands' shops and found white, lime green, orange, yellow nad light brown tanks. Here is the result:


After that I thinked that will be great to make a whole crochet back of thetank. After sewing skirts from vintage crochet tableclothes a few pieces remains. Of course, I never throw nothing)) So I had a red and blue piece and big pink rectangular doily. I matched a trim to sew round the neck and scye. 


The last one is with blue hand dyed tablecloth border. 

All of them are absolutely unique!

Tuesday, June 18, 2013

Art Bead Palette :: MayaHoney

Katerina from MayaHoney is my friend and I admire her work. Her beads (and photography!) are fantastic, and I love the colors oh so much. I found this article in Internet and was so fascinated by combination of photos with beads and color pallettes that I decided to post them on my blog.


Found on> Artbeadscene
 

©2009 Katrinshine | by TNB