Saturday, December 7, 2013

Button Wreath Christmas tree ornament DIY

If you have a lot of buttons in your house, do not rush to throw them away, because they can be used for ...  Christmas tree decor! Make this project with your children)


All you need - a lot of flat buttons, thin ribbon, yarn or wire, and ribbon for bow! Just thread buttons in the order you like. Then tie the ends of the ribbon and make a loop to hang it on the Christmas tree. Then make a bow from second ribbon and sew it over the knot. 


If you replace the tape with wire, the decoration will be perfectly round because the buttons on the ribbon sag under the weight.


 Your decoration is ready!

Thursday, December 5, 2013

Beads And Ribbon Christmas tree DIY


How to make a cute Christmas tree decor with a minimum of time and money? Use materials which are always at hand! When you have imagination and a little bit of creativity, you can make a little Christmas tree almost from anything: from branches, from cardboard, from Christmas decorations, from ladders. In each craftswomen’s house you can easily find ribbon and beads, why don’t use them? Today I'll show you how to make a Christmas tree from ribbon and beads.
You will need a minimum of materials - ribbon (I bought a Christmas one, but can use any you have at home), beads (better bigger, not too small), thread with a needle.


 Secure the thread on the edge of the ribbon.

 Then thread on a bead. I took two, because they was enough small but larger I did not find at home.

 Fold over the ribbon.  Push the needle up through the centre. Add a bead. Fold the ribbon back, making it sit just a little in from the last layer.

 Continue until you have a Christmas tree shape!
 Secure the thread and then make a loop to hang the Christmas tree.
 I'll show you two ways to finish the Christmas tree, but you can come up with your own.

The first way - wrap piece of ribbon around top of the Christmas tree and glue.
 The second way - wrap several times end of the ribbon inside, so it does not dissolve.
 That's what we've got:


Tuesday, December 3, 2013

Christmas bow with pine cones DIY

For Shabby chic Lovers other simple and cute DIY. It takes minimum time but the result is absolutely amazing and romantic. You can use it to decorate your Christmas tree or just hang it in the house. In Italy is very popular to decorate the tree with golden and red ribbon bows. I added to this idea small pine cones and it became even better!


You need 
- Christmas ribbon
- 6 small pine cones
- glue
- seed beads (optional)
- piece of yarn about 20-30 cm

Make a bow, then glue 3 pine cones in the center. Decorate space between them with seed beads. Make a bow from the yarn and sew it on the back of the ribbon bow. Then glue remaining 3 pine cones.


 Here is the result. Is it cute, isn't it?


Monday, November 25, 2013

Christmas shabby chic heart DIY

For Shabby chic Lovers I created this simple but so cute DIY. It takes minimum time but the resuld is absolutely amazing and romantic. You can use it to decorate your Christmas tree or just hang it in the house. I bought a heart, but we can do any other form, here the principle is important.

You will need:

  • Heart 
  • Ribbon (0.5m)
  • Pack of small cones
  • beads
  • Glue (I used PVA)


So, first make a ribbon bow in any way you like. Fire edges of the ribbon.

Glue the bow on the heart.

Then glue cones, I had to keep them pressed until the glue grabbed a bit.

Glue beads In spaces between the cones. Generally, this is optional , if you do not want, you can not do it.

Here's what I got:


Friday, November 22, 2013

Black friday Cyber monday sale!

Take the occasion! Black friday Cyber monday sale!

 You can receive 40% off in my graphic shop KarisaGraphic.etsy.com
 
30% off in Crochet vintage treasuries shop Katrinshinesupplies.etsy.com
 
20% off in jewelry and accessories shop Katrinshine.etsy.com!

 
Use coupon code 

CYBERMONDAY2013 

at the check out.
Coupon code will be active from November 29, 2013 to December 2, 2013 only.

Thursday, November 21, 2013

New shabby chic digital collage sheets and wedding package

This autumn I made a lot of new collage. Most of them are backgrounds for scrapbooking that can be used also for labels, greeting cards and other projects. 


But there are also something new: place cards, thank you card and table numbers. 


I made even Shabby chic Wedding set with all designs you need for the wedding, in total 7 designs which can be customized with your information.
Invitation kit contains:
Invitation, Menu, RSVP Card, Save the date card, Thank you card, Table numbers, Place cards


Wednesday, November 20, 2013

Handmade yarn feather DIY

Today I'll show you how to make a yarn feather. You can use it in a scrapbooking project or cards decoration, making earrings or....


You will need:
  • yarn (how many colors you want ) such as cotton crochet yarn, can be a bit thicker or thinner
  • Wire
  • glue ( to secure the ends of the thread)
  • PVA adhesive
Cut a piece of wire about 15-20 cm (length of the feather)

For beginning apply glue to the end of the wire. Starting  about 0.5" from the end of the wire, begin winding tightly the thread around the wire. 

When you reach the end, apply  glue (so the thread doesn't slip off from the end) and wind back for about 0.5". Make a little knot and cut off the thread.

Now you need to cut a lot of pieces of thread about 2-3" long. Length should be a little more than expected width of the feather.

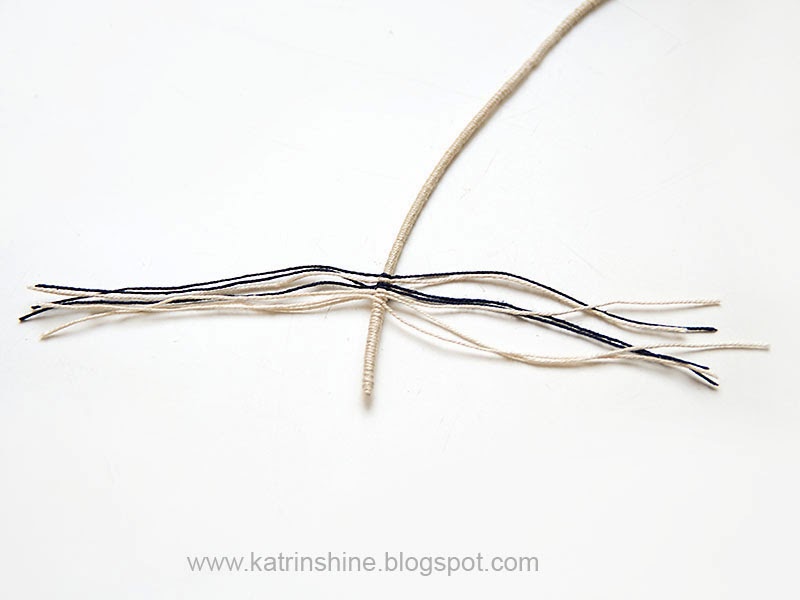
Begin single knotting each piece of thread starting about a half inch from the end - where you cut the thread. This will hide it and will not let it dissolve.
Follow through all the way to the end. Here's what we got.

Now , dilute a bit of PVA adhesive about 2:1, to the consistency of milk. Dip all pen in adhesive. Then gently squeeze excess adhesive out of the feather.

Lay out on a piece of plastic shape or flat surface with your fingers and let sit until completely dried. It will take at least 24 hrs (depends of the type of yarn). 

So now take pair of scissors and trim to desired shape and dimensions.
Happy crafting! 


©2009 Katrinshine | by TNB